
Authy is an alternative app to Google Authenticator for multi-factor authentication (2-step verification, 2FA, MFA). It is more feature-rich and allows for multi-device syncing, cloud-based backups, and easier account recovery should you change or lose phones.
Set-Up MFA with Authy
To setup Multi-Factor Authentication (MFA) for Okta with Authy, follow these steps.
- On your computer, navigate to a website or service that requires Multi-Factor Authentication (MFA), such as checkmyokta.com.
- Enter your username and password. Click the Sign In button.

- When presented with a prompt to set up Multi-Factor Authentication (MFA), click "Setup" under the SMS Authentication option first. This is helpful if you lose, break, or replace your phone.

- Type in a phone number where you can receive SMS messages (text messages) and click Send code.

- Check your mobile device. Enter the 6-digit code that was texted to you and click Verify.

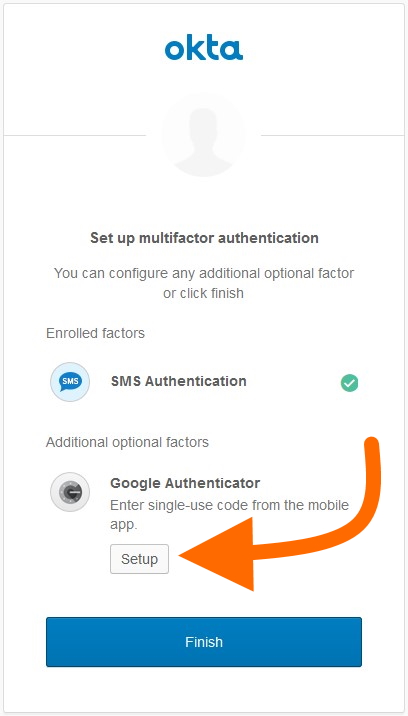
- You're almost done! Click Setup under the Google Authenticator option.
- If you will be using an iPhone as your secondary device to help you get logged in, select iPhone. Otherwise, select Android. If you're not sure which option to choose, select Android.

NOTE: If you don't already have it installed, pause here and install the Authy app on your mobile device (instead of Google Authenticator). Links to the iOS App Store (for Apple products), Google Play Store (for Android and Samsung devices), Windows or Mac, and Linux are available. This YouTube video is a quick walk-through of how to set up Authy.
- Open the Authy app on your mobile device.
- In Authy, enter your phone number and your email address to create your Authy account.
- Receive via SMS (text) message the registration code (or obtain it by phone call) and enter it into Authy to verify your new Authy account.
- In Authy, click Add Account.
- On iOS (iPhone), click the red + sign at the bottom of the screen in Authy to add a new MFA account for Okta.
- On Android & Samsung devices, tap the "…" icon in the upper right corner to open the menu, and select the Add Account option.
- On the Authy Desktop app, click the + (plus) sign in the upper right corner.
- Create a Authy Backups Password when prompted.
- Use your mobile device to scan the QR Code displayed by Okta, then click Next.

- In Authy, feel free to choose a new icon and rename the MFA token name for Okta.com: givenname.surname@example.com, if you like. Something like "Okta" should be sufficient.
- Authy needs no internet connection to generate a time-based code, but it does require an accurate time on your mobile device. The Authy app will generate a 6-digit, time-based code on your mobile device.
- Enter the 6-digit code that was generated by Authy into Okta and click Verify.

If all went well, you are now setup to use Multi-Factor Authentication and should be signed into the website or service you were attempting to access!
Adding Additional Devices (optional)
You will want to add a secondary device to access Authy. This device will serve as a backup in case you lose access to your primary device. The 2nd device can be either a mobile device or the Authy desktop application. In the case that you do not have a 2nd device, please make sure to keep your phone number updated within the Authy application and follow the instructions below for Disable Multi-device.
Once you have Authy installed on the 2nd device do the following:
Authy Desktop - Additional Device
- Enable Multi-Device on one of your devices that already has Authy configured. (see below)
- Open Authy Desktop on the new device.
- Enter mobile phone number used during the initial setup.
- Click Next.
- Click Existing Device to indicate verification method.
- Switch to the Initial Authy Device.
- There should be a prompt asking for the new device to be authorized. Type OK and then click or tap OK.
Authy on Android or iOS - Additional Device
- Open Authy on the new device.
- Enter mobile phone number used during the initial setup.
- Touch or click OK.
- Touch or click ADD NEW DEVICE.
- Enter a name for the device and touch or click ADD DEVICE.
- Switch to the Initial Authy Device.
- There should be a prompt asking for the new device to be authorized. Type OK and then click or tap OK.
You may need to click on an existing two factor token listed and enter the backup password you provided during the initial setup of Authy to access the tokens from this new device.
Disable/Enable Multi-device (recommended, not required)
NOTE: You will must Enable Multi-Device before you add a new device. Disable Multi-Device once you’ve added the new device(s).
This keeps people from being able to hack into your Authy - even if they get your Authy password.
Open Authy on any of your devices and perform the following instructions.
Authy Desktop
- Click Settings on the main screen.
- Click Devices.
- Click Disable next to Multi-device (or Enable if you want to add new devices))
Authy on Android or iOS
- Tap Settings under the mobile app menu.
- Tap Devices.
- Slide the switch to disable setting for “Allow multi-device” (or enable if you want to add new devices). This will prevent the adding of new devices which could be added by hijacking your phone number.